|
|
Post by sagittariusmoon on Feb 11, 2017 23:53:33 GMT 1
Welcome meliodas.  |
|
|
|
Post by sagittariusmoon on Feb 9, 2017 23:36:35 GMT 1
Wear headphones if the volume is too low for you to hear. Recording was a bit quiet. Very brief intro into texturing with a 3d view inside of 3ds max's Vieport canvas program. Excellent for getting rid of seam lines and texture breaks, so the textures flow together from mesh cut to cut. (where the uvw map breaks from one part to the other.) You can do detailed work inside of max also, with a tablet or transfer your worked on _d texture file to gimp etc and do the work there. Remember to make tifs with any paint program by opening up your desired texture and resaving it out as a .tif (Tif is the format for textures you want to paint with) Even windows paint program can do this for you, as well as gimp, etc. Final Picture below is to detail things I had no time to record, due to bad internet. Save your texture when you are done painting by right clicking with the mouse. It will open up a save options window. Below in the pic you will noticed that I have highlighted in orange the save feature you should use. Saving this way, keeps your layer work in tact and separate. Should you have to go in and change or correct something on a layer, this save option allows you to do this, when reopening the texture at a later time. This preserves the layers when you open the _d. dds inside of gimp as well. Just very useful for making your normal maps and doing adjustments and details. The green boxes highlight where you can make layer adjustments as you paint inside of Viewport canvas. Similar to what you can do in gimp. Just click them open and take a look when and if you decide to paint on a 3D model in real time. Keep in mind that painting over the seam line by a very small amount will help diminish the seams showing up in game. (paint in the same texture or color to do this) Use the 2D format to accomplish this task. Hope this helps. 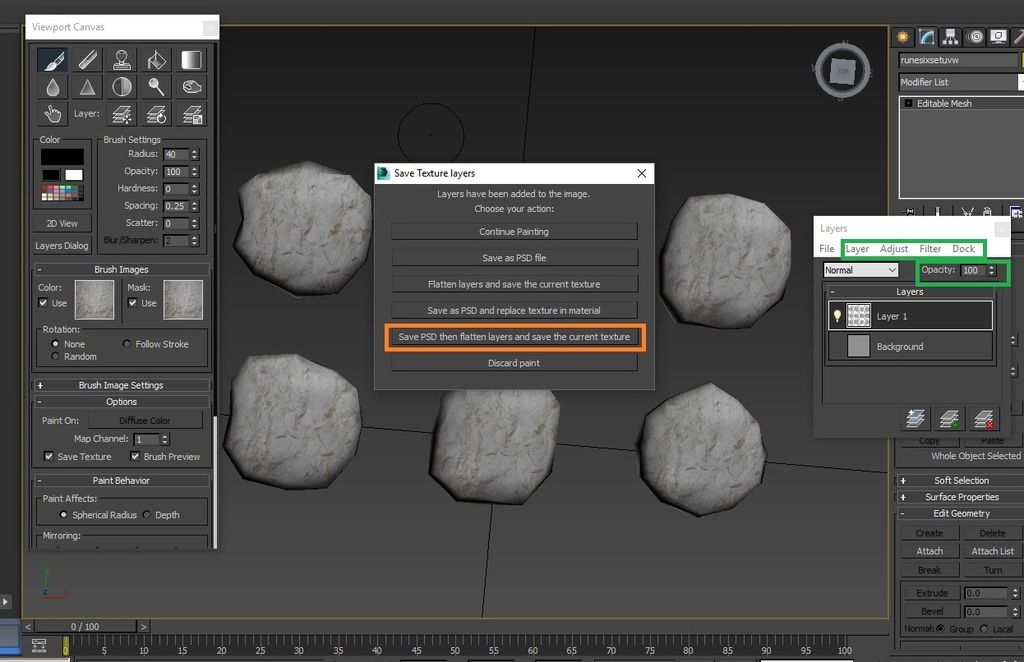 |
|
|
|
Post by sagittariusmoon on Jan 21, 2017 10:46:33 GMT 1
I absolutely love your impression of Sheogorath. You are very practiced, very good.
|
|
|
|
Post by sagittariusmoon on Apr 30, 2016 0:36:09 GMT 1
As the title above states. This is two very quick video links to making collision with 3DS max 2014. Even if you do not use this to make collision it should give you some ideas on setting up the nifskope files when done. Use headphones to hear and turn up the volume, After, the commercials. I had to be soft spoken to record at this point, while using a generic headset. The two final pictures are what you "delete" in the exported collision Nif, before adding in your nifs to the collision files. The parts you delete are highlighted in yellow. This should be very easy to follow, even if you have a short attention span.  try to enjoy. Also if you need the plugin to do collision in 2014, just ask me and I will put the files in dropbox or direct you to the online resource, if it still exists or if I can find it. Taking the plugin means you need to set up the plugin 'yourself' in 3DS max. It's fairly simple. P.S. Remember to read the video description. I give a little more detailed hints. That means you will have to open the video up to view on youtube. Hint:: When it comes to the Nifskope setting up of collision. You can actually borrow another items collision, delete that items physical nif and then paste your own 'new' Nif on the BSFadeNode line. While the collision will not match your items exactly, in certain instances this is ideal and a quick method to have collision barriers. Delete these in your open Nif, inside of NIfskope 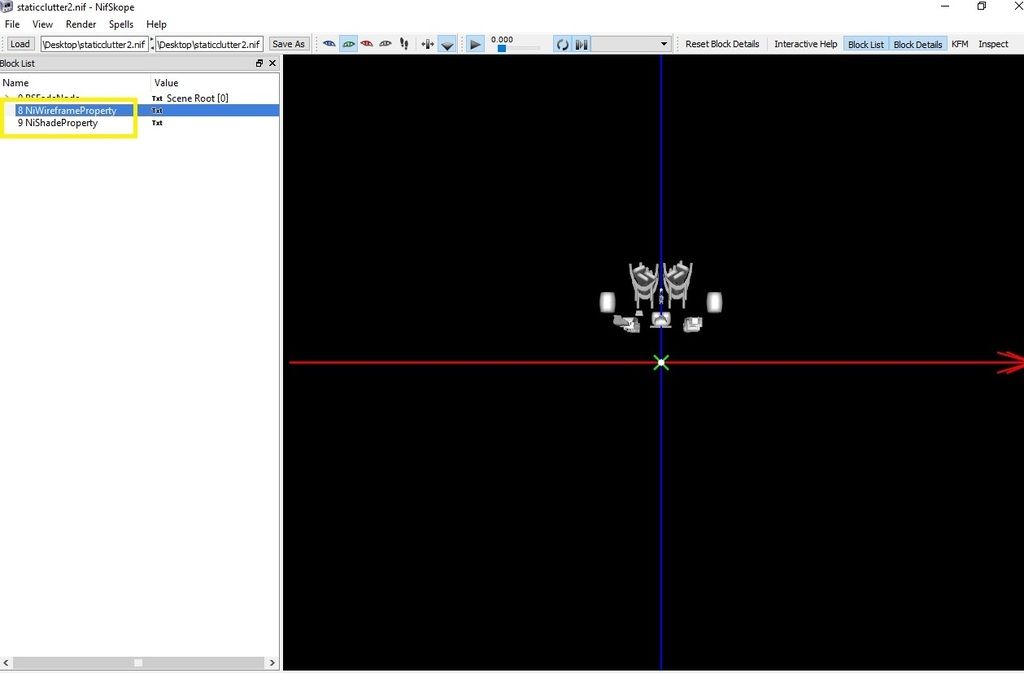 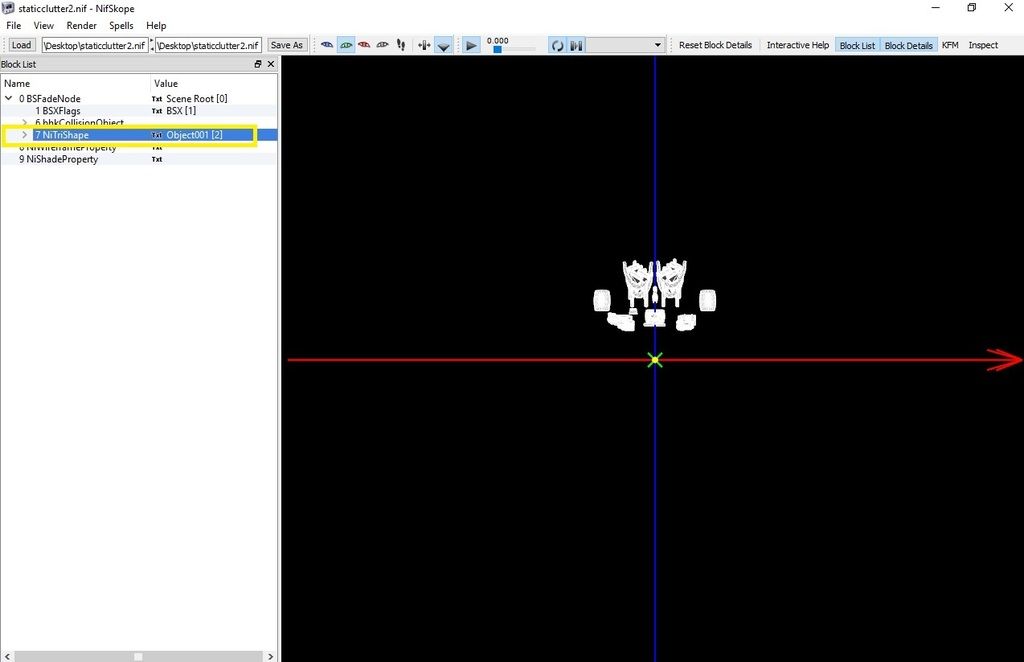 |
|
|
|
Post by sagittariusmoon on Feb 2, 2016 7:50:54 GMT 1
*nods* It looks like it should be something I could learn to do. I just have a specific spider type in mind and would like to make it a real project one of these days.
|
|
|
|
Post by sagittariusmoon on Jan 26, 2016 3:45:49 GMT 1
As the subject states, this is just a quick video of me stitching the swan together, piece by piece. This is done for fragmented maps that need to be portioned out into larger wholes. Place your pieces together like a puzzle and then stich or weld verts. If you watch the video you will see how this eliminates the green borders that you would otherwise have to carefully paint/texture over to prevent obvious seams. Note:: Carefully rotating your map parts and moving vertices is relatively harmless since the uvw map is not finalized until you are done and convert into an editable mesh. Even then you can go in and do mild vert movements on the map, if something is seriously out of place. Worst case scenario is you will have to start over welding your map, if you have done something wrong. Making maps in this fashion is probably one of the least enjoyable processes and I avoid it when I can. Enjoy the video. |
|
|
|
Post by sagittariusmoon on Jan 13, 2016 0:13:15 GMT 1
Well, since I already got this thing set up, maybe I will dink with that hideous ape face later, after the swan and stuff. See if I can make it more interesting that a half naked monkey
|
|
|
|
Post by sagittariusmoon on Jan 12, 2016 23:50:34 GMT 1
The new troll is that file uploaded just above. Not that I am working on one. It's finished and in game and uploaded here onto the forum. As for the ship, I have to focus on that swan first.
Will just upload this separated mesh verion on the Nexus. Probably, people will want the three maps separated like this one has.
|
|
|
|
Post by sagittariusmoon on Jan 12, 2016 19:08:17 GMT 1
Did the test I wanted and created the race for this new troll body in the ck, put it into game. Just did not want to chance hearing that the troll was not working, etc. Here is the link to the troll file with it inside of CK. Currently 1 testing troll is just outside Riverwood, outside the gates, directly up the hill past the guard camp. Don't want it there for testing delete it and move someplace else. All parts are named S_Atmoratroll in the CK Currently he is non aggressive for testing. When you want, just change that in the CK by setting his aggression levels and returning his Troll and creature status. drive.google.com/file/d/0B5NiiLdDvDqTMXhPUnpyS20tVUk/view?usp=sharingPhoto of it in game working fine.  |
|
|
|
Post by sagittariusmoon on Jan 12, 2016 18:14:01 GMT 1
Hannes. Yes, if he tries to fade the main body map with transparency it is going to degrade the entire body into clear. So he would have needed to separate the maps. But, I just spent half the morning doing that in max. So, what I did, is break apart the troll. Please note, these are still Bethesda's uvw map work. I moved nothing out of place. I am uploading a file for a new troll mesh. This is what you will have to use for the game if he retextures these maps. They will no longer work on the actual vanilla troll. The CK file is not set up, this is just the nif with the separated maps. Three parts included. Mouth, Body and Fur. The skinning/rigging is intact. Bethedsa's rigging, exactly, so the animations are going to be vanilla. Nothing has changed, but that you can paint this guy much easier now. The hair panels you can do your main transparency on and will not fade the body away. They are a separate map, just like the mouth uses it's own pathing. The body still has some natural hair areas on the back of the head and jaw and ankle area. Those I can not remove without rigging the whole troll, and I really don't want to. It takes a few days to get it all back in order, with my schedule. Possibly more, depending on what life throws at me. So, just carefully, do your transparency on only the edges of those parts of the body map that require hair transparency. Use the hand selection tool to capture the exact area where you want to fade the texture into transparency. Or hand paint out the transparencies in these few 'body' areas with the eraser tool. All that said, here is the file and the 'best' I can offer you for now. There should be very few issues with you doing what you need to do. |
|
|
|
Post by sagittariusmoon on Jan 12, 2016 6:04:13 GMT 1
@ majormodder Ok, I went into max and broke down the original UVW map. Meaning this file is vanilla's map, with just the panels showing. I did not move them out of placement, even a millimeter. Hopefully, this will help you out some, even though their placement is still an ugly mess. drive.google.com/file/d/0B5NiiLdDvDqTbVJHWkdlSHJwOGc/view?usp=sharingEdit:: Keep in mind that the file I sent you is a 3D studio. You can open it in blender, change it into a nif if you need to and then extract the map. You do not want to use the panel mesh I sent, unless it is centered onto the body again. Just ignore the mesh and use the map for making fur transparencies that match the original full uvw. |
|
|
|
Post by sagittariusmoon on Jan 12, 2016 5:05:37 GMT 1
Ok, what Bethesda has done is layer their uvw maps. They did the same exact mess with the vanilla longboat, which is why this time around I just made my own hull, rather than mess with their tragic disaster of a map. All those little hair pieces you are trying to manipulate are actually laying, right on top of the base body mesh. They are in roughly the same position they would be were the uvw map in 3D form. What I imagine the solution would be and what they probably did for their transparency... was to have a secondary layer that only included those fur panel pieces. That was then the only thing used for the transparency top layer, before merging it down onto the main. These maps are why I learned to make my own, because Bethesda's are horrible. Example pics. The green lines are the map cuts. Where the uvws end and begin. The first is full 3d and the second is a close up of the 2d flat map. Pay mind to the red verts I have highlighted on the 3d arm, in picture two and where they appear on the flat map. That little green outline the red dots are touching, Is the hair panel that is selected in the 3d view. 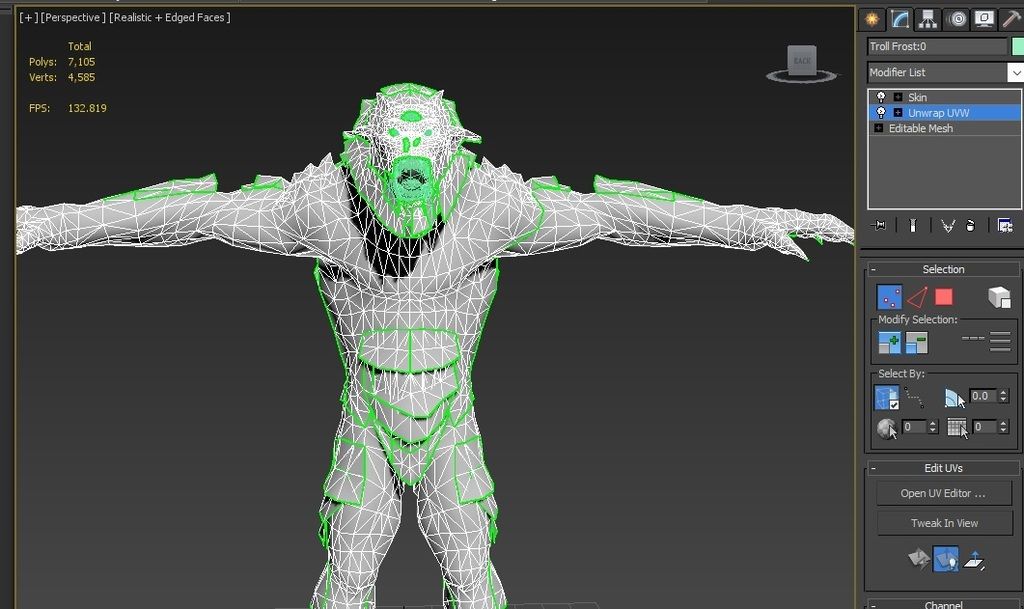 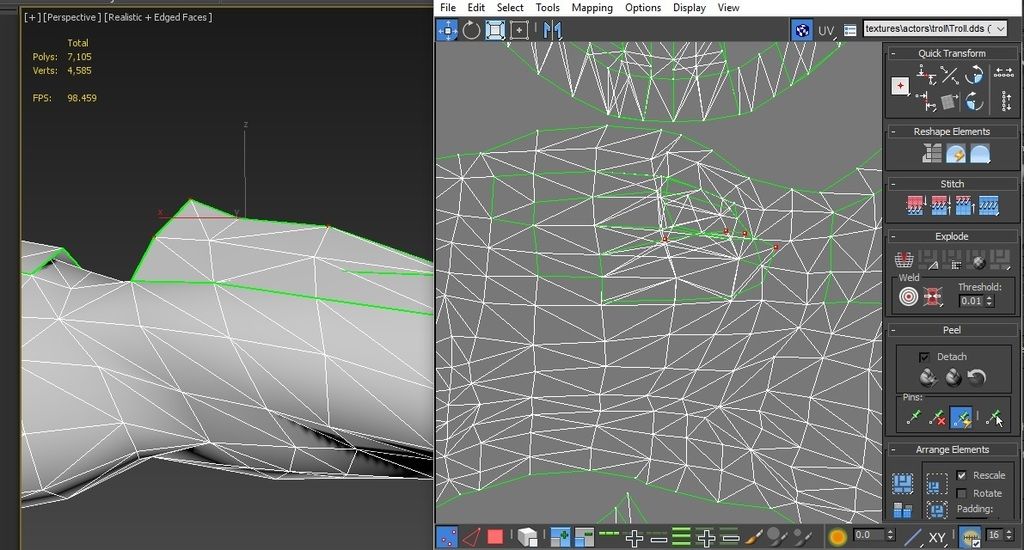 |
|
|
|
Post by sagittariusmoon on Jan 11, 2016 6:16:24 GMT 1
P.S. Keep in mind that looking at your texture work inside of a 3D program may not be showing you everything your transparency work is doing. Sometimes, loading it into game is the only way to see the whole picture. Max even has a habit of distorting some transparency work, while in game it looks fine.
|
|
|
|
Post by sagittariusmoon on Jan 11, 2016 6:07:37 GMT 1
Starting up the initial thread for this, so we can begin discussing. Because of my life schedule this will be the easiest way to communicate. Will post what I believe helpful and help research when we get stuck on something, if I have time. NOTICE:: My knowledge of transparency is limited, not Expert. IF you know a better way to do something, feel free to Nicely, post your version of doing things. In other words have some modesty.So, to start, you do not have to do a, new layer, for the eraser work, but the file will have to be set to your alpha state and the nif have the appropriate designations. Meaning an NiAlphaProperty. You will see below the video a pic of what is being referred to. I am sure most people stumbling across this forum, are already aware you need this for transparency in Skryim. A few may have no idea and need to know, so I am including the info. Now, if you are going to do defined transparency with black background and hand painting or inverted, specialized copies of the original work in black and white, etc... you will need to use the New Layer option and set a layer mask on the original texture map layer, Not the new layer. Here is a video link to a Great tutorial for beginners. I learned a lot from Nightasy on how to mod. Hope others do to. Just remember the point is to learn how to mod, not critic what material he chooses to create. For the most part, to each their own. Next is a screenshot of an Apachiisky hair file. For the settings on the nif and if you look, I highlighted in yellow boxes, where your attention needs to be. Specifically on the file name for this one, as Apachiisky hair has Two nif files for most of the hairstyles, if not all. If you have questions about why Apachii has this, you Need to ask them. Their reasons could be different than what I am posting below.Two nifs for one hairstyle is not out of the question and is common in other video games. It offers Two different texturing works to be combined for one hair effect. This is very useful for transparency and multicolored hair say (red long layer and black short layer). Makes texture painting very easy to have separate texture maps for two different colors or transparencies. You can even use one version for a near solid and then scale the other version a little and change the transparency to be more sheer. Causing an illusion of strands or see through tufts of hair.. Say on a bear or other animal. Now, from what I can tell, Skryim just uses normal masks and painted transparency, not two layers of hair for different effects. Now, if you are using an animal for the hair project, you Do Not need the entire animal mesh twice. You just need to duplicate the hair panels, which will not harm the texture map, Unless, you 'convert' the copied parts into a new mesh or convertible poly, for whatever reasons. Meaning don't do that. Just copy the parts you want and delete everything you do not need. Use those parts as a second NIF and layer it with the original.  Eraser settings: You can use selection tools and trace an area you want to make slightly or very transparent. Once you have it in the selection box, circle or hand traced outline, you use the eraser to adjust transparency. Test out your Strength settings on the eraser to find the transparency you are looking for. This works on armour too, not just hair. Second eraser option:: by hand, use your paint brush options on your eraser and "erase paint" on the mesh you are wanting to give certain transparencies. Again, the eraser strength will determine the effect of the transparency. 100% for gone and very low settings of 5 or under for "mostly there". Ok, anyone may add to this thread if they have further helpful suggestions. You can ask me a question and if I do not know an answer, will be straight forward and tell you I haven't a clue. However, it is likely that I will do research, "When" I have free time. |
|
|
|
Post by sagittariusmoon on Jan 11, 2016 5:13:51 GMT 1
I may try it out, since it is free. See how well it works and what files it can export out as. Still, I suspect anything like that will require topology to get the poly count lower. Pro optimize is good, but it wreaks havoc on the original shape if you are not careful. |
|
|
|
Post by sagittariusmoon on Jan 10, 2016 14:00:14 GMT 1
It does look like it could be fun. More than likely you will have to convert any creation into an OBJ, or 3d file so that you can import it into Max or another modeling program that supports nif exportation. Since I do not have that program, hard to say. |
|
|
|
Post by sagittariusmoon on Oct 27, 2015 13:01:11 GMT 1
Quick tutorial in two parts, due to internet. Points out some basic issues that would cause problems with armour or armor showing up in game and how to set it up quickly in creation kit, borrowing the layout from an existing mod, if you don't want to do it by hand. (notice:: this does not cover everything you need to do in creation kit, but is enough to get a novice started.)
Video 1
Video 2
And yes, the internet poofed again, while streaming. The end of part two was just telling you to utilize another mods set up, if ever in doubt about placement and construction of an item in game. Replace the existing mesh, with your own, skinned, weight sliding version. Or static. Whatever you happen to be working on at the time.
|
|
|
|
Post by sagittariusmoon on Oct 21, 2015 11:08:24 GMT 1
@ Hannes821 Thank you for the comment on the Fox video. I currently use 3ds max 2014 and a different plugin than Figment's. At the time that I upgraded to 2014 Max, Figment had not updated his/her nif plugin, is the reason why. I probably will not switch to Figment's at this time, since I have a personal project already in the works that requires custom collision and it does not look like Figment's offers that option, where the plugin I use does. However, I could be wrong and will check their plugin out when I am not in the middle of in progress works.  lol Regardless Figment's is the plugin you want to use for NIF export. I used it when I still had max 2012 and it always worked like a charm. If figments does not work for making collision, most modders use this (ChunkMerge) to add collision to new static game meshes. github.com/skyfox69/NifUtils/downloadsHere is a wiki tutorial on it niftools.sourceforge.net/wiki/Skyrim/Adding_Collision_Mesh_using_ChunkMergeAnd a Nexus fix plugin for ChunkMerge to correct an error that occurs for some people: www.nexusmods.com/skyrim/mods/46273/?I will not be much help with ChunkMerge since I don't use it,(yet) but it is the usual go to program for most Skyrim collision. Of course collision for armour and most drop items does not require using chunkmerge, since you can just borrow collision from similar _Go items from Skyrim itself. You may already know all this, but some people passing through might like the links, I suppose. |
|
|
|
Post by sagittariusmoon on Aug 16, 2015 0:12:57 GMT 1
Hello there, I go by the handle, SagittariusMoon on most creative forums. What I do for mods lately is model. 3DS Max 2014, Gimp, Nifskope, CK set up of files. Before I got into modeling 3D armour and now statics. I would do some terrain work for custom housing. Including navameshing and light scripting to get things in my houses to switch out. Like claw holders, masks, etc. Working with cells. Followers, etc. Basically, I like to create. I do write, more for the female set, but you can check it out here: samsaranights.wordpress.com/category/thorn/ There are two fanfictions up based on the Skyrim Romance mod, which I have done armour work for. Soon to be released. Check out my work here: i1160.photobucket.com/albums/q500/Heavenorb/ScreenShot54.png You will have to click screens to get to new sets, since I do stage screen shots at different points of meshing. Yes, the cattails I made too. Will try out for voice acting if/when needed. Female only and probably not elderly. Hope this helps! |
|


 lol
lol